Set up waivers and contracts
Paperwork without the paper. Collect signed docs with our WaiverForever integration. Use it for waivers, rental agreements, and other must-sign moments.
Connect WaiverForever
- Create a WaiverForever account.
- Go to Waiver Templates and create a template.
- Start from a gallery template, upload a PDF, or build from scratch.
- Publish the template.
- Open Webhooks & API and generate a New Application Key.
- Paste that key into WaiverForever API Key in our Integrations page, then submit.
Use the built-in Name field in your WaiverForever template. We extract it and show it on the booking detail page.
Set up each document
Every WaiverForever template shows up under Prefill documents on the Waivers integration page. Expand a template card to configure it.
Document settings
- Title: name it your way or add translations.
- Description: we prefill it; tweak as needed.
- Who should sign:
- Primary renter for contracts where one signature covers the booking.
- One per boat for contracts on multi-boat bookings.
- All passengers for waivers, when you track headcount.
- Anyone for waivers, when headcount is not tracked.
For "All passengers", set your boat model to ask for passenger count. Otherwise pick "Anyone".
Prefill fields
Stop asking customers to retype data you already have. Map each WaiverForever field to a Let's Book variable so waivers arrive pre-filled when the customer signs.
Pick a variable from the dropdown next to each field:
- Customer: Name, Email, Phone number.
- Booking: reference, passengers, boats.
- Rental: pickup date, return date, dock name, boat model name.
Choose Not mapped for fields you want the customer to fill themselves. Signature, checkbox, and number fields can't be prefilled, ever.
The badge in the card header tracks progress. Green means every mappable field has a variable, yellow means only some do.
Give your WaiverForever fields clear titles like "Customer email" or "Pickup date". Vague labels like "Field 3" make mapping a guessing game.
Customer details always come from the booking's primary renter, even when "Who should sign" is set to a different option.
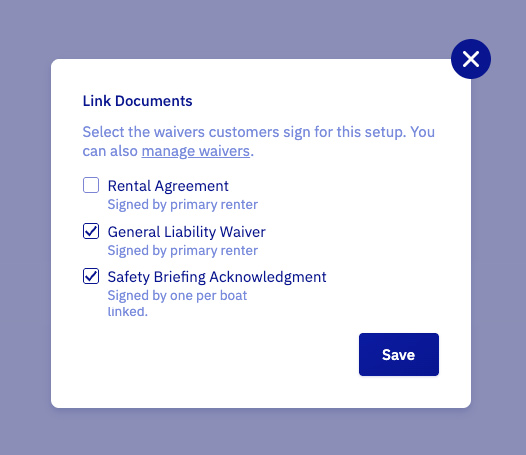
Link documents to a dock and boat model
Now decide when renters see each document.
- Open Rental setup and pick the dock and boat model.
- Click Edit on the Documents to sign card.
- Check every template you want signed for this combination, then save.
Templates that still need configuration on the Integrations page show up as disabled rows with a "Needs setup" hint.